1. Support
  2. For Installers
  3. 7kW Smart Home Charge Point

Quick Installation Guide

How to install 7kW Smart Home Series Charge Point

Enplus Quick Installation Guide home smart series coverTABLE OF CONTENTS
  1. BEFORE YOU START
  2. VISUAL OVERVIEW
  3. HARDWARE INSTALLATION REFERENCE
  4. NETWORK SETUP
  5. MONTA INTEGRATION


1. BEFORE YOU START

Charge Point Installation Requirement

  1. This product shall only be installed, repaired, or serviced by a qualified and authorised electrician.
    All applicable local, regional, and national regulations for electrical installations must be respected.
  2. Please check the Wi-Fi router frequency band and network strength at the point of installation.

    • This charge point only supports a 2.4GHz network.

    • Wi-Fi signal strength between -50dBm to -60dBm is considered good.

    • A 2.4GHz Wi-Fi extender may be needed if the signal strength is lower than -60dBm. 

    • The Wi-Fi signal strength can be checked with a smartphone at the point of installation using a suitable WiFi Speed Test mobile app.

  3. This charge point is equipped with 6mA DC RCD protection and PEN fault detection features. An appropriate residual current protection(Type A or Type F) and overload protection or equivalent must be fitted on the electrical supply end of this charge point.
  4. For installation planning, please check the Mounting Template and EN+ User Manual included as a reference for the installation.
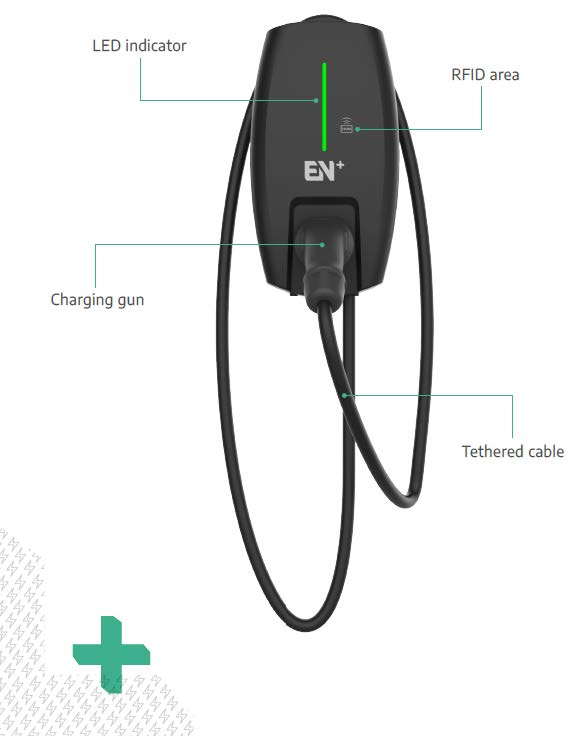
2. VISUAL OVERVIEW


Enplus Quick Installation Guide visual overview


3. HARDWARE INSTALLATION REFERENCE

Inside this box, you will find...

install guide hardware ref

You will also find the following manuals...

User Manual

user manual

Mounting Template

mounting template

Monta Integration Guide

monta guide

4. NETWORK SETUP

Follow the steps below to configure the network:

Step 1: Aeroplane Mode

  • Switch your smartphone to aeroplane mode

Step 2: Power Reboot

  • Restart the power of EN+ Charge Point and ensure the indicator light is flashing green

    Please note that the network configuration setting is only accessible 15 minutes after power reboot

Enplus Quick Installation Guide network step 1

Step 3: Charge Point Wi-Fi

  • Activate Wi-Fi on your smartphone
  • Wait for a minute, and select the charge point hotspot beginning with the characters SN100.

Step 4: Input Password

  • Input "admin123" as the password

  • Select "Connect"

Step 5: Automatic Network Switch

  •  Reject switching to a different Wi-Fi network when the prompt is displayed.  
  •  The smartphone will communicate with the charge point without an internet connection

Step 6: Open Network Configuration Webpage 

  • Open a web browser on the smartphone
  • Go to 192.168.4.1 to open the network configuration page
  • Input the 4-digit network pin. The network pin can be found on the cover of the charge point. Please take note of the pin and remove the pin sticker from the charge point
  • Tap Login
  • If the webpage is not accessible, please reboot the charge point power

Step 7:  Open Charge Point Setup 

  • Open the Charge Point Setup menu to configure the Wi-Fi


Step 8: Wi-Fi Setup 

  • Tap on the Wi-Fi dropdown menu icon and select the nearby Wi-Fi
  • Input the Wi-Fi password 
  • Click Confirm
  • A confirmation message will appear and the charge point will restart its network

Step 9:  Verifying Network Connectivity 

    • To verify the network, repeat steps 3 - 6. If it is not accessible, reset the power. 
    • Check that the Wi-Fi strength indicates either "Good" or "Excellent".
    • If the Wi-Fi strength is poor, change to a stronger network or install a Wi-Fi extender
    • Ensure that "Server Communication" indicates "Connected" and that "Network Status" indicates "Online"

    You are now ready for Monta integration!

    Complete your last steps via the Monta Integration Guide included inside this product packaging to integrate the EN+ Charge Point with the Monta Mobile App.